Maya Nurbs 汽车坐椅建模(2)
Maya Nurbs 汽车坐椅建模翻译说明: 为了让大家更能理解这个教程,我并不翻译其中一些命令,这样可以让一些初学者 ( 不是很熟悉 Maya Nurbs 建模命令 ) 更快找到这些命令。另:我的英文不好,所以在翻译的时候会有一些不足之处,如果有让你发笑的地方,请你给我提醒,我将更改过来 , 我的 Email: chinacache@163.com.
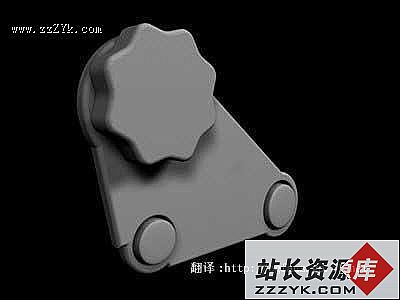
Now select all of your objects, go to the render menu, then select set NURBS tessellation , set curvature tolerance to highest quality, U and V around 5000 , click set and close then render it, then you will have this cute looking object (pic 12).
选择你所有的物体,进入到全局渲染里,设置 NURBS tessellation , 将 curvature tolerance 高为更高组另, U 和 V 取到 5000, 然后 set and close 并渲染它,这样我们得到如 (pic 12) 的物体 .
pic 12
Wheee...everything is so easy and so smooth with Maya isn't it ?, But oops...this is just part 1. :(
Note : You could put logo there or do whatever you want, more detail or something... :)
喔 ....Maya 是否很简单 ? 不要急,以上只是第一节 :(
注意 : 你可以在这里放上你喜欢的标记 , 或者刻画更多的细节 .... :)
Now select all these objects, group them and name the group "rotator", and then save this file as "rotator_gear.mb" or do whatever you like with the file name. :)
现在选择你所有的物体,并将它们成组,将组命名为 "rotator", 并存储文件为 "rototor_gearmb"( 也可以是你想用的名字 )
Create Bottom Seat Upholstery
制作椅子的扶手
From side view, create 2 profile curves like in this image (pic 13), then from front view, create a NURBS circle with 18 sections, rotate it 90°, then adjust the CV's with the scale and move tools until it looks like in this image (pic 14).
在侧视窗,创建两条轮廓曲线 (pic 13), 回到前视窗,再创建一条 Nurbs 圆形曲线 (section 18), 旋转 90 度,然后调整它的各 CV 点到像 (pic 14) 所示 .
pic 13
pic 14

Here's the perspective view
这是透视图
Then duplicate this curve and rescale it (y axis), move it many times (following the shape of the profile curve) until it looks like this (pic 14). Note : you must rescale the start and end curves very small (pic 15).
然后复制一些曲线并在 y 轴方向上放大或缩小它们,调整到如 (pic 14). 记住 : 最开始和结束的曲线你要尽量将其缩到最小 .(pic 15)
pic 14

pic 15
Then select these 3 curves (pic 16), select a couple of the top CV's and then move them to the left a little bit and rotate them also to the left (pic 17).
选择这 3 条曲线 (pic 16), 将它们的一些 CV 点向左移动并消微放大一点 (pic 17).
pic 16

pic 17

[1] [2] 下一页
Now select all these curves from start to end (not the profile) and then surface > loft . You will have this new object (pic 18), now duplicate mirror this new object with the parameters shown here (pic 19).
Note : The Translate value could be different, but Scale -1 is a must for mirror duplicate :)
现在依此选择这些曲线(不含那条轮廓线 ) 然后 surface > loft . 你将得到一个曲面如 (pic 18), 接着以镜像的方式复制这个物体,复制的选项请看 (pic 19).
注意 : 移动 (translate) 的数值可以有所不同,但是拉伸 (scale) 的数值为 -1 时表示以镜像的方式复制 .
Pic 18

pic 19
上一页 [1] [2]
上一个:Maya 花的建摸
下一个:Maya 制作路径火花动画效果


- 更多Maya疑问解答:
- Maya 4.0 NURBS建模-创建NURBS表面(4)
- Maya 硬件渲染粒子与软件渲染元素结合(1)
- 如何使用MEL Scripts
- Maya 4.0 创建场景物体-移动场景中的物体
- Maya 4.0 动画的基础知识-动画的基本概念
- Maya 硬件渲染粒子与软件渲染元素结合(3)
- Maya 4.0 界面介绍(1)
- Maya 4.0 骨骼动画-基本概念
- Maya 4.0 动画的基础知识-创建关键帧
- Maya 4.0 粒子系统-力场(2)
- Maya 4.0 渲染基础-渲染动画
- Maya 4.0 渲染基础-制作背景
- Maya 4.0 渲染基础-制作基本材质
- Maya 4.0 NURBS建模-创建NURBS表面(2)
- Maya 4.0 创建场景物体-准备工作(1)
部份技术文章来自网络,