VM虚拟机下在LINUX上安装ORACLE 11G单实例数据库
1.环境及安装前规划:虚拟机及OS如下
环境:VMware Wordstation ACE版 6.0.2
操作系统:OracleLinux-R5-U8-Server-i386-dvd 3.2G
安装操作系统,这里需要注意的是磁盘空间要预留足够。
我的规划是:
虚拟机分配1024M内存,当然如果主机内存足够,安装时内存设置2048M可以更快。
虚拟机分配一块磁盘,30G磁盘空间。
/boot 100M ext3
/ 20G ext3
swap 2048M
剩余的近8G空间留着做ASM时用。
同时最好安装系统时选择图形模式安装,直接安装好图形模式,比较省事。
2.OS的配置:
操作系统安装好后,暂时需要配置以下内容
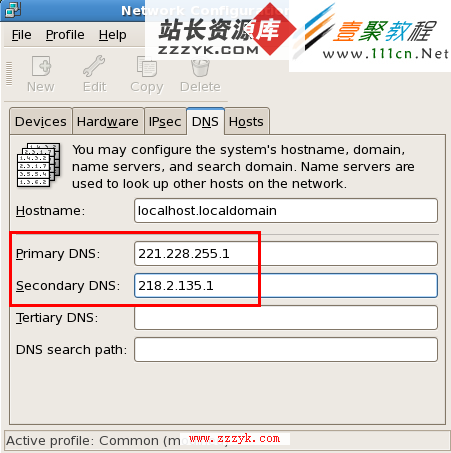
固定IP及DNS /etc/sysconfig/network-scripts/ifcfg-eth0
主机名 /etc/sysconfig/network
修改开机运行级别 /etc/inittab
关闭SELINUX /boot/grub/menu.lst
修改sshd_config,解决SSH超时自动断开问题
login as: root
root@192.168.1.212's password:
Last login: Wed Jun 5 09:11:26 2013
[root@oel-01 ~]# hostname
oel-01
[root@oel-01 ~]# cat/etc/sysconfig/network-scripts/ifcfg-eth0
# Advanced Micro Devices [AMD] 79c970[PCnet32 LANCE]
DEVICE=eth0
BOOTPROTO=none
HWADDR=00:0C:29:99:8B:C9
ONBOOT=yes
NETMASK=255.255.255.128
IPADDR=192.168.1.212
GATEWAY=192.168.1.254
TYPE=Ethernet
USERCTL=no
IPV6INIT=no
PEERDNS=yes
[root@oel-01 ~]# cat /etc/resolv.conf
nameserver 222.88.88.88
[root@oel-01 ~]# cat /etc/sysconfig/network
NETWORKING=yes
NETWORKING_IPV6=yes
HOSTNAME=oel-01
[root@oel-01 ~]# vi /etc/inittab
id:3:initdefault:
[root@oel-01 ~]# vi /boot/grub/menu.lst
在kernel 行末尾增加selinux=0关闭SELINUX。也可以在安装完系统时的图形配置界面中关闭。
[root@oel-01 ~]# cd /etc/ssh/
[root@oel-01 ssh]# grep"ClientAlive" sshd_config
#ClientAliveInterval 0
#ClientAliveCountMax 3
[root@oel-01 ssh]# cp sshd_configsshd_config.bak
[root@oel-01 ssh]# sed -i"s/#ClientAliveInterval 0/ClientAliveInterval 60/g" sshd_config
[root@oel-01 ssh]# grep"ClientAlive" sshd_config
ClientAliveInterval 60
#ClientAliveCountMax 3
[root@oel-01 ssh]# sed -i"s/#ClientAliveCountMax 3/ClientAliveCountMax 10/g" sshd_config
[root@oel-01 ssh]# grep"ClientAlive" sshd_config
ClientAliveInterval 60
ClientAliveCountMax 10
[root@oel-01 ssh]# service sshd restart
Stopping sshd: [ OK ]
Starting sshd: [ OK ]
到此应该将系统重启,验证以上各项配置是否生效。如生效,关机,在VMWARE中做快照
3.创建安装ORACLE的用户组
[root@oel-01 ~]# groupadd -g 1000 oinstall
[root@oel-01 ~]# groupadd -g 1031 dba
[root@oel-01 ~]# groupadd -g 1032 oper
[root@oel-01 ~]# useradd oracle
[root@oel-01 ~]# passwd oracle
Changing password for user oracle.
New UNIX password:
BAD PASSWORD: it is based on a dictionaryword
Retype new UNIX password:
passwd: all authentication tokens updatedsuccessfully.
[root@oel-01 ~]# usermod -g oinstall -Gdba,oper oracle
[root@oel-01 ~]# mkdir -p/u01/app/oracle/product/11.2.0/dbhome_1
[root@oel-01 ~]# chown -R oracle:oinstall/u01/
[root@oel-01 ~]# chmod 775 /u01/
[root@oel-01 app]# pwd
/u01/app
[root@oel-01 app]# ls -al
total 16
drwxrwxr-x 4 oracle oinstall 4096 Jun 5 10:56 .
drwxrwxr-x 3 oracle oinstall 4096 Jun 5 10:55 ..
drwxrwxr-x 2 oracle oinstall 4096 Jun 5 10:55 oracle
4.挂载光盘,安装软件
[root@oel-01 ~]# cd /etc/yum.repos.d/
[root@oel-01 yum.repos.d]# ls
[root@oel-01 yum.repos.d]# viOEL_CDROM.repo
[root@oel-01 yum.repos.d]# catOEL_CDROM.repo
[OEL5.8]
name=oracle linux
baseurl=file:///mnt/cdrom/Server
enabled=1
gpgcheck=0
[root@oel-01 yum.repos.d]# cd /mnt/
[root@oel-01 mnt]# mkdir cdrom
[root@oel-01 mnt]# mount /dev/cdrom/mnt/cdrom
mount: block device /dev/cdrom iswrite-protected, mounting read-only
[root@oel-01 mnt]# ls
cdrom
[root@oel-01 mnt]# cd cdrom/
[root@oel-01 cdrom]# ls
blafdoc.css eula.py README-en.html Server
Cluster GPL RELEASE-NOTES-en supportinfo
ClusterStorage images RELEASE-NOTES-en.html TRANS.TBL
EULA isolinux RPM-GPG-KEY VT
eula.en_US README-en RPM-GPG-KEY-oracle
[[root@oel-01 Server]# pwd
/mnt/cdrom/Server
[root@oel-01 Server]# ls /etc/pki/rpm-gpg/
RPM-GPG-KEY RPM-GPG-KEY-fedora RPM-GPG-KEY-oracle
RPM-GPG-KEY-EL4 RPM-GPG-KEY-fedora-test
[root@oel-01 Server]# rpm --import/etc/pki/rpm-gpg/RPM-GPG-KEY-oracle
开始安装软件
方法一:
[root@oel-01 Server]# yum -y installoracleasm-support-2.1.7-1.el5.i386.rpm
[root@oel-01 Server]# yum -y installreadline-devel-5.1-3.el5.i386.rpm
[root@oel-01 Server]# yum -y installunixODBC
[root@oel-01 Server]# yum -y install make* gcc* glibc* compat-db* compat-gcc*compat-gcc* compat-libstdc++* compat-libstdc* openmotif* setarch*
[root@oel-01 Server]# yum -y installelfutils-libelf-devel-* libaio-devel-0.3.106-5.i386.rpm sysstat-7.0.2-11.el5.i386.rpm unixODBC-devel-2.2.11-10.el5.i386.rpm
安装rlwrap-0.37.tar.gz,这里我也是上传上去的,这个软件可以在网上自己找。
[root@oel-01 ~]# ls
anaconda-ks.cfg install.log rlwrap-0.37
Desktop install.log.syslog rlwrap-0.37.tar.gz
[root@oel-01 ~]# tar -zxvfrlwrap-0.37.tar.gz
[root@oel-01 rlwrap-0.37]# pwd
/root/rlwrap-0.37
[root@oel-01 rlwrap-0.37]# ./configure
[root@oel-01 rlwrap-0.37]# make
[root@oel-01 rlwrap-0.37]# make install
方法二:批量安装
挂载光盘后
[root@oel-01 mnt]#mkdir cdrom
[root@oel-01 mnt]# mount /dev/cdrom/mnt/cdrom/
mount: block device /dev/cdrom is write-protected, mounting read-only
[root@oel-01 mnt]# cd /etc/yum.repos.d/
[root@oel-01 yum.repos.d]# vi public-yum-el5.repo
[oel5]
name = Enterprise Linux 5.7 DVD
baseurl=file:///mnt/cdrom/Server/
gpgcheck=0
enabled=1
[root@oel-01 yum.repos.d]# yum installoracle-validated
&nbs