IOS研究院之打开照相机与本地相册选择图片
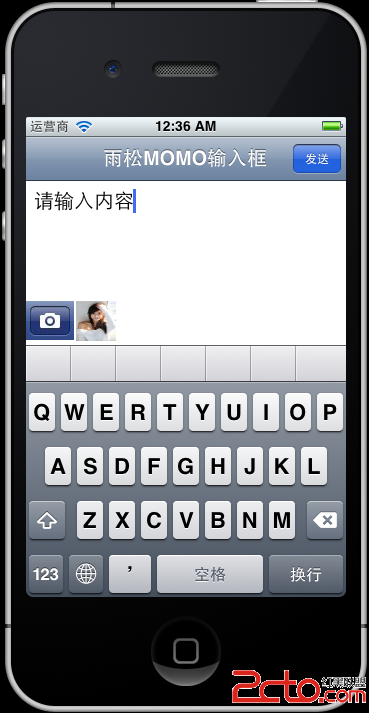
如下图所示 在本地相册中选择一张图片后,我们将他拷贝至沙盒当中,在客户端中将它的缩略图放在按钮旁边,这个结构其实和新浪微薄中选择图片后的效果一样。最终点击发送将按钮将图片2进制图片上传服务器。下面我们仔细学习具体的细节。创建一个空的IOS项目,接着在创建一个ViewController。AppDelegate.h 应用的代理类 这个没什么好说的就是直接打开刚刚创建的新ViewController。1#import <UIKit/UIKit.h>2#import "TestViewController.h"34@inte易做图ce AppDelegate : UIResponder <UIApplicationDelegate>56@property (strong, nonatomic) UIWindow *window;7@property (strong, nonatomic) UINavigationController *navController;8@property (strong, nonatomic) UIViewController *viewController;9@endAppDelegate.m 在这里就是打开我们创建的TestViewController01#import "AppDelegate.h"0203@implementation AppDelegate0405@synthesize window = _window;06@synthesize navController;07@synthesize viewController;0809- (void)dealloc10{11[_window release];12[super dealloc];13}1415- (BOOL)application:(UIApplication *)application didFinishLaunchingWithOptions:(NSDictionary *)launchOptions16{17self.window = [[[UIWindow alloc] initWithFrame:[[UIScreen mainScreen] bounds]] autorelease];1819self.window.backgroundColor = [UIColor whiteColor];20self.viewController = [[TestViewController alloc]init];21self.navController = [[UINavigationController alloc] initWithRootViewController:self.viewController];22[self.window addSubview:navController.view];2324[self.window makeKeyAndVisible];25return YES;26}2728@endTestViewController.h 注意这里面引入了很多代理类。01#import <UIKit/UIKit.h>0203@inte易做图ce TestViewController : UIViewController<UITextViewDelegate,UIActionSheetDelegate,UINavigationControllerDelegate,UIImagePickerControllerDelegate>04{05//输入框06UITextView *_textEditor;0708//下拉菜单09UIActionSheet *myActionSheet;1011//图片2进制路径12NSString* filePath;13}14@endTestViewController.m 请大家仔细看这个类, 所有的东西都写在了这里哈。001#import "TestViewController.h"002003@inte易做图ce TestViewController ()004005@end006007@implementation TestViewController008009- (void)viewDidLoad010{011[super viewDidLoad];012//导航栏标题013self.navigationItem.title = @"雨松MOMO输入框";014015//导航栏按钮016self.navigationItem.rightBarButtonItem = [[[UIBarButtonItem alloc]017initWithTitle: @"发送"018style: UIBarButtonItemStyleDone019target: self020action: @selector(sendInfo)] autorelease];021022//输入框显示区域023_textEditor = [[UITextView alloc] initWithFrame:CGRectMake(0, 0, 320, 100)];024//设置它的代理025_textEditor.delegate = self;026_textEditor.autoresizingMask = UIViewAutoresizingFlexibleWidth;027_textEditor.keyboardType = UIKeyboardTypeDefault;028_textEditor.font = [UIFont systemFontOfSize:20];029_textEditor.text = @"请输入内容";030031//默认软键盘是在触摸区域后才会打开032//这里表示进入当前ViewController直接打开软键盘033[_textEditor becomeFirstResponder];034035//把输入框加在视图中036[self.view addSubview:_textEditor];037038//下方的图片按钮 点击后呼出菜单 打开摄像机 查找本地相册039UIImage *image = [[UIImage alloc] initWithContentsOfFile:[[NSBundle mainBundle] pathForResource:@"camera" ofType:@"png"]];040041UIButton *button = [UIButton buttonWithType:UIButtonTypeCustom];042button.frame = CGRectMake(0, 120, image.size.width, image.size.height);043044[button setImage:image forState:UIControlStateNormal];045046[button addTarget:self action:@selector(openMenu) forControlEvents:UIControlEventTouchUpInside];047048//把它也加在视图当中049[self.view addSubview:button];050051}052053-(void)openMenu054{055//在这里呼出下方菜单按钮项056myActionSheet = [[UIActionSheet alloc]057initWithTitle:nil058补充:软件开发 , C++ ,上一个:C++流操作之fstream
下一个:POJ 3740 DLX
- 更多C/C++疑问解答:
- 关于c++的cout输出的问题。
- 在学校里学过C和C++,不过学的很一般,现在自学C#,会不会很难?
- 全国计算机二级C语言笔试题
- 已知某树有2个2度结点,3个3度结点,4个4度结点,问有几个叶子结点?
- c++数据结构内部排序问题,整数排序
- 2012九月计算机二级C语言全国题库,,急求急求
- 如果assert只有一个字符串作为参数,是什么意思呢?
- C语言中,哪些运算符具有左结合性,哪些具有右结合性,帮忙总结下,谢谢了!
- 为什么用结构体编写的程序输入是,0输不出来啊~~~
- 将IEEE—754的十六进制转化为十进制浮点类型,用C或C++都行,多谢各位大侠啊,非常感谢!
- 为什么这个程序求不出公式?
- 这个链表倒置的算法请大家分析下
- c语言函数库调用
- C语言unsigned int纠错
- C语言快排求解啊