PHPstorm中xdebug安装配置说明
配xdebug已经不是第一次了,但配phpstorm的xdebug还是头一次(自认纠错能力还是挺强的,再加上对框架的熟悉程度很能快,知道问题文件所在位置直接修复代码,就没必要去用xdebug+IDE调试找问题了)。从4月份参加新工作以来一直没时间折腾IDE层面上的东西,今天终于有点空余的时间可以自由发挥下了~
由于安装和配置xdebug是老生常谈的话题,这里就不再叙述安装xdebug的方式和过程,仅针对phpstorm要求的php.ini讲解下xdebug部分的配置要求。
php.ini配置
"[xdebug]
zend_extension=”/usr/lib/php/extensions/no-debug-non-zts-20090626/xdebug.so”
xdebug.idekey=”PHPSTORM”
xdebug.remote_host=127.0.0.1
xdebug.remote_enable=on
xdebug.remote_port = 9000
xdebug.remote_handler = “dbgp”
xdebug.auto_trace = 1
xdebug.collect_includes = 1
xdebug.collect_params = 1
xdebug.collect_return = 1
xdebug.default_enable = 1
xdebug.collect_assignments = 1
xdebug.collect_vars = 1
xdebug.remote_autostart = 1
xdebug.remote_connect_back = 1
xdebug.show_local_vars = 1
xdebug.show_exception_trace = 0
"关于 xdebug.so 如何配置,Xdebug 文档中有说明:
"Configure PHP to Use Xdebug
add the following line to php.ini: zend_extension=”/wherever/you/put/it/xdebug.so” (for non-threaded use of PHP, for example the CLI, CGI or Apache 1.3 module) or: zend_extension_ts=”/wherever/you/put/it/xdebug.so” (for threaded usage of PHP, for example the Apache 2 work MPM or the the ISAPI module). Note: In case you compiled PHP yourself and used –enable-debug you would have to use zend_extension_debug=. From PHP 5.3 onwards, you always need to use the zend_extension PHP.ini setting name, and not zend_extension_ts, nor zend_extension_debug. However, your compile options (ZTS/normal build; debug/non-debug) still need to match with what PHP is using.
Restart your webserver.
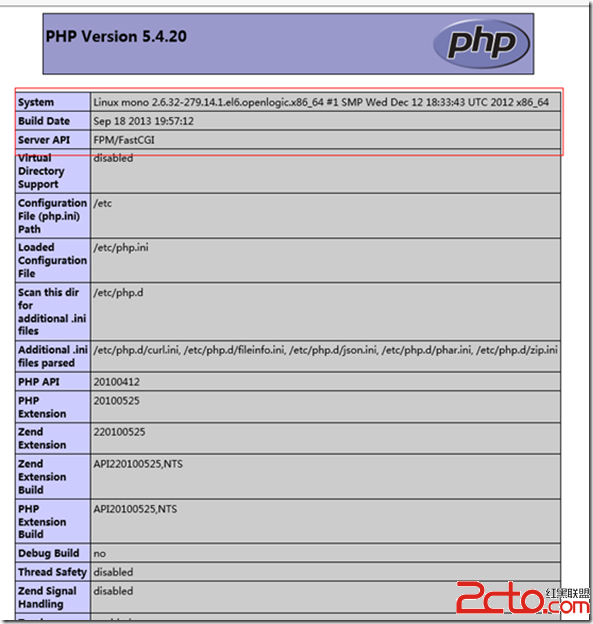
Write a PHP page that calls ‘phpinfo()’ Load it in a browser and look for the info on the Xdebug module. If you see it next to the Zend logo, you have been successful! You can also use ‘php -m’ if you have a command line version of PHP, it lists all loaded modules. Xdebug should appear twice there (once under ‘PHP Modules’ and once under ‘Zend Modules’).
"其中使用 zend_extension_ts 还是 zend_extension 还是神马神马,与 PHP 版本有关,仔细看上面的说明。
重启下 Web Server(Apache / Nginx),使用 phpinfo() 页面或命令行工具,确认模块安装完成。
phpstorm配置
我用的是phpstorm5.0.4,即便是更低版本也没关系,本教程所讲述的配置方式在4.0~5.+版本中是通用的。
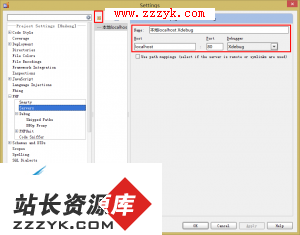
1.File>Settings,PHP | Server:点击+符号,Name一栏输入你给服务器指定的名称,Host一栏输入调试服务器的地址,无需“http://”开头。Port一栏输入服务器的商品(通常为默认值80),Debugger一栏选择Xebug。
Debugger一栏选择Xebug。
2.File>Settings,PHP | Debug,在Xdebug标签框内,根据服务器端的Xdebug端口,配置Debug port,并根据需要配置其它参数。
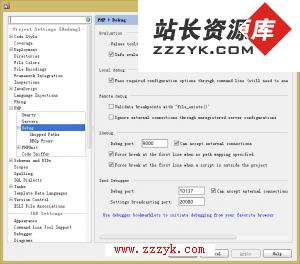
3.点击 Use debugger bookmarklets to initiate debugging from your favorite browser,在系统的默认浏览器中配置debugger书签。
4.默认浏览器被打开,并进入http://www.jetbrains.com/phpstorm/marklets/,修改Xebug一栏下的Ide key,默认为PHPSTORM。
5.点击Xdebug一栏中的Generate按钮,在浏览器的书签中添加Xdebug组,其中有Xdebugger的各个项。
6.回到PHPStorm,在settings对话框中的 PHP | Debug | Xdebug Proxy中,将第五步中指定的Ide key添入,并配置代理主机及代理端口。
到此,已经可以使用“监听”功能了。 只 要在访问指定的调试服务器上的应用程序时,先在PHPStorm中点击 Start Listen PHP Debug connection按钮,启动对调试端口的监听;

点击浏览器书签中的xdebug Start Session,开启debug功能,再点击xdebug this page、xdebug break on、xdebug break off等,即可调用PHP Storm,对程序进行调试,增删断点、显示当前状态下变量和表达式的值,非常的方便。
另外针对框架/项目的调试方式需要在以上配置基础上,再进行一些配置:
1.点击菜单里的 Run – Edit Configurations选项。
2.在弹出的对话框中,依图配置:
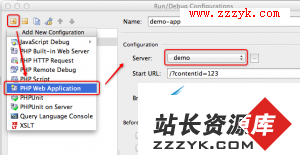
3.如图所示:点击 “添加” 按钮,选择 PHP Web Application,并在右侧输入配置名称,选择我们刚刚添加的 Server,Start URL 中填写调试可能所需的查询字符串,选择好默认浏览器,最后点击 Apply 和 OK,确认配置。
4.然后,还有一步:
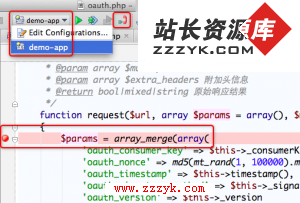
在程序中设置好断点;
在工具栏中,选择好要调试的应用;
点击 Start Listen PHP Debug Connections 按钮,即那个红色的电话按钮,让其变成绿色,即开始监听 PHP Debug 连接;
于是,终于可以开始了。
点击上图中的 Debug 按钮,或者从菜单中选择 Run – Debug,你就开始了 Debug 之旅…
其他说明
根据断点配置,或在打开 Debug URL 的过程中,或在 POST 之后,如果 PhpStorm 监听到了 Debug 连接,就会立即切换到编辑器界面,并跳转到设置的断点处,浏览器端会等待 PhpStorm 的操作。
你可以随时中断 PhpStorm 的调试,或方便的进行 Step Into / Step Over / Run to cursor(这个刁爆了):
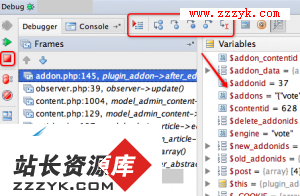
熟悉 Java 的童鞋会对这个界面感到亲切,吼吼。
哎呀,不想调试了,PhpStorm 却总是跳出来?记得刚刚那个电话按钮嘛,再点一下,让其变成红色,就好了。
先到这里,嗯哼。自己捣鼓捣鼓吧
补充:Php教程,Php安装