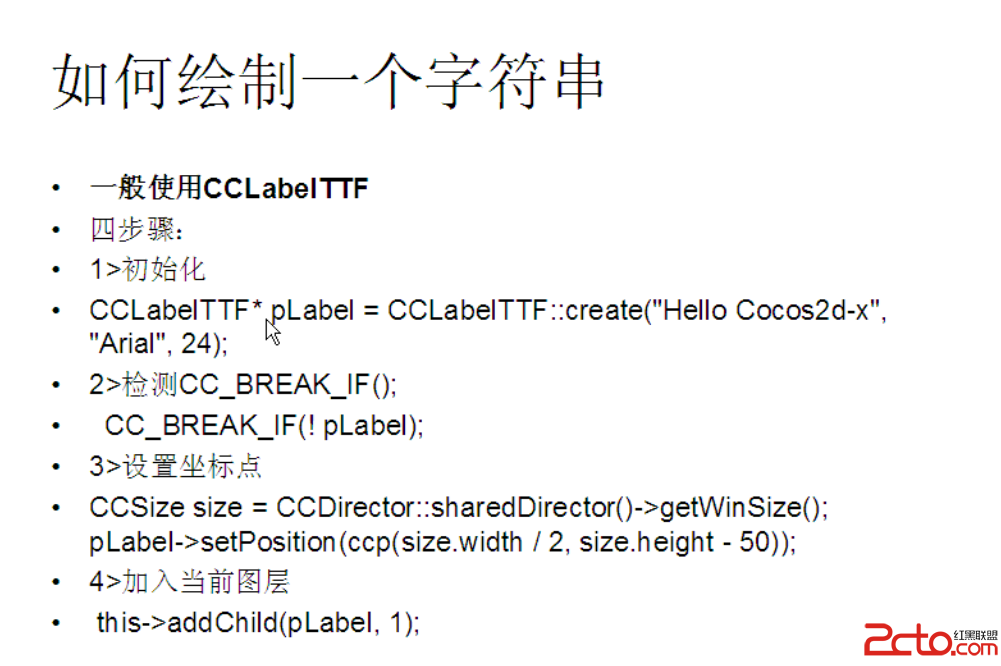
图片展现、缩放、移动及裁减的实现
首先,读取一个图片文件到UIImage对象中,添加到一个UIImageView视图中。UIImageView的size设置成和图片的size一样。保证图片能全部展现。
// Create the image from a png file
UIImage *image = [UIImage imageNamed:@"prgBinary.jpg"];
UIImageView *imageView = [[UIImageView alloc] initWithImage:image];
// Get size of current image
CGSize size = [image size];
// Frame location in view to show original image
[imageView setFrame:CGRectMake(0, 0, size.width, size.height)];
[[self view] addSubview:imageView];
[imageView release];
这样UIImageView视图可以通过放大、缩小、移动的方式查看超出屏幕范围的部分图。
将图放大或者缩小到合适尺寸,移动需要裁减的图的一部分到屏幕中,再进行裁减。这样保证裁减到的部分是需要进行图像识别的文字,从而提升识别效率。
使用pinch手势和pan手势实现图像缩放和图像移动操作,将合适的内容完全拉入屏幕中。
使用pan手势移动uiimageview视图。
- (void)pan:(UIPanGestureRecognizer *)gesture
{
if ((gesture.state == UIGestureRecognizerStateChanged) ||
(gesture.state == UIGestureRecognizerStateEnded)) {
CGPoint location = [gesture locationInView:[self superview]];
[self setCenter:location];
}
}
使用pinch手势缩放uiimageview视图。
-(void)handlePinch:(UIPinchGestureRecognizer*)sender {
NSLog(@"latscale = %f",mLastScale);
mCurrentScale += [sender scale] - mLastScale;
mLastScale = [sender scale];
if (sender.state == UIGestureRecognizerStateEnded)
{
mLastScale = 1.0;
}
CGAffineTransform currentTransform = CGAffineTransformIdentity;
CGAffineTransform newTransform = CGAffineTransformScale(currentTransform, mCurrentScale, mCurrentScale);
mGestureView.transform = newTransform;
}
缩放后的图片,裁减是还是针对了原来的图。因此需要将屏幕进行照相,生成一个图,供裁减操作。因为裁减只能在可看到的区域里进行。
- (UIImage *)imageWithUIView:(UIView *)view
{
CGSize screenShotSize = view.bounds.size;
UIImage *img;
UIGraphicsBeginImageContext(screenShotSize);
CGContextRef context = UIGraphicsGetCurrentContext();
CGContextSaveGState(context);
[view.layer renderInContext:UIGraphicsGetCurrentContext()];
img = UIGraphicsGetImageFromCurrentImageContext();
CGContextRestoreGState(context);
UIGraphicsEndImageContext();
return img;
}
采用手指滑动画线成矩形框的方式,指定裁减的区域,而后确认。
1、可以用UIBezierPath画一个矩形。它的实现方法大概这样,
UIBezierPath* aPath = [UIBezierPath bezierPath];
// Set the starting point of the shape.
[aPath moveToPoint:CGPointMake(100.0, 0.0)];
// Draw the lines
[aPath addLineToPoint:CGPointMake(200.0, 0.0)];
[aPath addLineToPoint:CGPointMake(200, 140)];
[aPath addLineToPoint:CGPointMake(0.0, 140)];
[aPath closePath];
参考一个uiview的子类,它使用touchMove调用UIBezierPath画图。
@implementation MyLineDrawingView
- (id)initWithFrame:(CGRect)frame
{
self = [super initWithFrame:frame];
if (self) {
// Initialization code
self.backgroundColor=[UIColor clear];
myPath=[[UIBezierPath alloc]init];
myPath.lineCapStyle=kCGLineCapRound;
myPath.miterLimit=0;
myPath.lineWidth=10;
brushPattern=[UIColor redColor];
}
return self;
}
// Only override drawRect: if you perform custom drawing.
// An empty implementation adversely affects performance during animation.
- (void)drawRect:(CGRect)rect
{
[brushPattern setStroke];
[myPath strokeWithBlendMode:kCGBlendModeNormal alpha:1.0];
// Drawing code
//[myPath stroke];
}
#pragma mark - Touch Methods
-(void)touchesBegan:(NSSet *)touches withEvent:(UIEvent *)event
{
UITouch *mytouch=[[touches allObjects] objectAtIndex:0];
[myPath moveToPoint:[mytouch locationInView:self]];
}
-(void)touchesMoved:(NSSet *)touches withEvent:(UIEvent *)event
{
UITouch *mytouch=[[touches allObjects] objectAtIndex:0];
[myPath addLineToPoint:[mytouch locationInView:self]];
[self setNeedsDisplay];
}
-(void)touchesEnded:(NSSet *)touches withEvent:(UIEvent *)event
{
[myPath closePath];
[self setNeedsDisplay];
}
2、如果不用UIBezierPath的话,还可以直接使用 Core Graphics 框架的API进行画线。
@implementation GestureView
{
CGPoint _originOfTouchPoint; // your fist touch detected in touchesBegan: method
CGPoint _currentFingerPositionPoint; // the position you have dragged your finger to
CGFloat _strokeWidth; // the width of the line you wish to draw
id _touchStartedObject; // the object(UIView) that the first touch was detected on
}
// If you use Interface Builder to design your interface, Objects in a nib file are reconstituted and then initialized using
// their initWithCoder: method
- (id)initWithCoder:(NSCoder *)decoder
{
self = [super initWithCoder:decoder];
if (self) {
// Initialization code
_originOfTouchPoint = CGPointMake( 0.0, 0.0 );
_currentFingerPositionPoint = CGPointMake( 100.0, 100.0 );
_strokeWidth = 2.0;
}
return self;
}
// Only override drawRect: if you perform custom drawing.
// An empty implementation adversely affects performance during animation.
- (void)drawRect:(CGRect)rect
{
CGContextRef context = UIGraphicsGetCurrentContext();
CGContextSetStrokeColorWithColor( context, [UIColor blueColor].CGColor );
CGContextSetLineWidth( context, _strokeWidth );
// fisrt p
补充:移动开发 , IOS ,