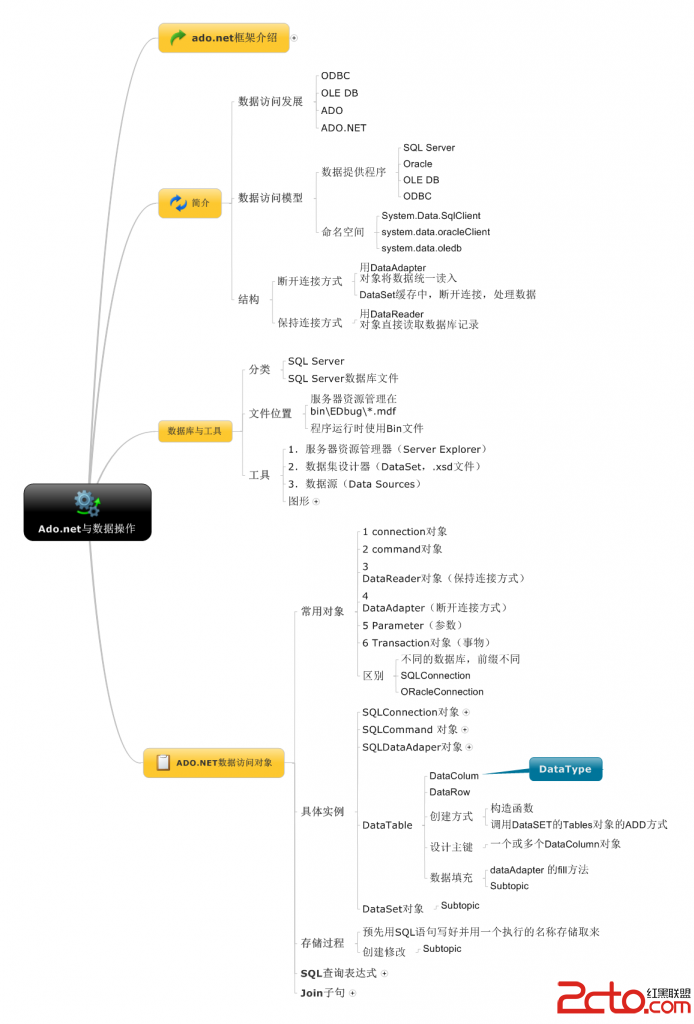
.NET实现的四层拓扑结构
	前段时间在JavaEye上风风雨雨的四层网元拓扑图掀起了一场Swing热潮。看后深有感触,何时我们搞.NET的也能用实现出这种的拓扑结构图。


	其实TWaver早已出了.NET版本,我想用TWaver来实现应该也不是很难,借助于之前Swing的例子,很快就实现了这样的效果图。今天就来分享一下我的思路。


	首先我们先来看看整个系统的结构


	很典型的四层拓扑,这四个层,我首先想到的也是用Group来实现,仿照之前Swing的例子,设置了group对应的属性


	view sourceprint?1 group.IsExpanded = true;


	2 group.SetStyle(Styles.BODY_ALPHA, 0.8);


	3 group.SetStyle(Styles.GROUP_FILL_COLOR, color);


	4 group.SetStyle(Styles.GROUP_GRADIENT, Consts.GRADIENT_LINEAR_NORTHEAST);


	5 group.SetStyle(Styles.LABEL_POSITION, Consts.POSITION_RIGHT);


	6 group.SetStyle(Styles.LABEL_XOFFSET, 100);


	7 group.SetStyle(Styles.LABEL_SIZE, 14);


	8 group.SetStyle(Styles.LABEL_BOLD, true);


	9 group.SetStyle(Styles.LABEL_FONT, new FontFamily("微软雅黑"));


	效果不太理想,矩形图形,翻阅TWaver相关文档,发现group上没有设置平行四边形的属性。这就比较麻烦了,我看可能是需要采取定制的功能了,还好TWaver在这方面比较人性化,留了相应的接口,可以重新绘制。


	我显示3D的平行四边形的效果图,我想需要给3Dgroup设置两个属性,一个是偏移(angle),也就是group相对于矩形的下方两个点的偏移位置;第二个是深度(deep),也就是3D的厚度。有了这两个参数我们就可以进行定制了。我们需要重写group的DrawContent()方法,在该方法中先取出Group自身的bound,根据angle绘制出平行四边形的四个点


	view sourceprint?01 double angle = group.Angle;


	02 double deep = group.Deep;


	03 double gap = bounds.Height / Math.Tan(angle * Math.PI / 180);


	04 PointCollection points = new PointCollection();


	05 Point p1 = new Point(bounds.X - gap, bounds.Y + bounds.Height);


	06 points.Add(p1);


	07 Point p2 = new Point(bounds.X + bounds.Width, bounds.Y + bounds.Height);


	08 points.Add(p2);


	09 Point p3 = new Point(bounds.X + bounds.Width + gap, bounds.Y);


	10 points.Add(p3);


	11 points.Add(new Point(bounds.X, bounds.Y));


	12 // Add


	13 path.Data = this.CreateGeometry(points);


	14 this.AddComponent(path);


	15 this.AddBodyBounds(path.Data.Bounds);


	接下来我们就需要绘制下面和右边那种3D的效果了,下方画一个小的平行四边形,这个我们只要计算好这个四边形的四个点就很容易绘制。这四个点可以通过大的大的平行四边形的下面两个点和高度得到:


	view sourceprint?01 // Add Bottom Rectangle


	02 path = new Path();


	03 // Set Fill


	04 path.Fill = Utils.CreateSolidColorBrush(fillColor);


	05 // Set Outline


	06 this.SetStroke(path);


	07 // Set Data


	08 RectangleGeometry rectangleGeometry = new RectangleGeometry();


	09 rectangleGeometry.Rect = new Rect(p1.X, p1.Y, p2.X-p1.X, deep);


	10 // Add


	11 path.Data = rectangleGeometry;


	12 this.AddComponent(path);


	13 this.AddBodyBounds(path.Data.Bounds);


	右边的平行四边形也类似,这里就不详解了。看看运行后的效果


	哈哈,感觉还不错,可以达到预期的效果了。平行四边形准备好了,接下来我们在四边形加上一些节点试试。


	 继续,用通用的方法创建四个group


	接下来我们就要实现这个Demo中的亮点:穿透效果。就是上层节点和下层节点有关联时,不同层之间的连线怎么去穿越group,这个就涉及到TWaver中层的概念了,上面的四层结构网元之间的覆盖关系就是通过层来实现的,软件业务层是最上层的元素,可以通过设置这个层为最上一层,那么这层上的元素就会覆盖下面所有层的元素。连线的穿透也是这样的道理,我们可以将连线分为上下两部分,上半部分和from节点处于一层,下半部分和to节点处于一层,中间用一个虚拟的节点相连。


	view sourceprint?01 private void CreateCrossLayerLink(object fromID, object toID, bool left)


	02         {


	03             Node from = (Node)this.box.GetDataByID(fromID);


	04             Node to = (Node)this.box.GetDataByID(toID);


	05             if (from == null || to == null)


	06             {


	07                 return;


	08             }


	09             ConnectPoint point = new ConnectPoint();


	10             point.LayerID = from.LayerID;


	11             double xOffset = -from.Width / 2 - 15;


	12             if (left)


	13             {


	14                 xOffset = from.Width / 2 + 15;


	15             }


	16             double yOffset = from.Height / 2 + 20;


	17             double x = from.CenterLocation.X + xOffset;


	18


补充:Web开发 , ASP.Net ,