答案:假如您用手在一幅还没干透的油画上迅速划过,画面就会变得模糊。CSS下的blur属性就会达到这种模糊的效果。
先来看一下blur属性的表达式:filter:blur(add=add,direction,strength=strength)
我们看到blur属性有三个参数:add、direction、strength。
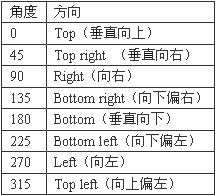
Add参数有两个参数值:true和false。意思是指定图片是否被改变成模糊效果。 Direction参数用来设置模糊的方向。模糊效果是按照顺时针方向进行的。其中0度代表垂直向上,每45度一个单位,默认值是向左的270度。角度方向的对应关系见下表:
Strength参数值只能使用整数来指定,它代表有多少像素的宽度将受到模糊影响。默认值是5像素。
还是看一个例子吧。===================
<html>
<head>
<title>blur css</title>
<script>
function handlechange(obj)
{
with(obj.filters(0))
{
if (strength<255)
{
strength +=2;
direction +=45;
}
}
}
</script>
</head><body>
<p><img id ="img1" src="http://old.zzzyk.com/article/Article/jsimg/1.jpg" style="filter:blur(strength=1)"
onfilterchange="handlechange(this)">
</p>
</body>
</html>=====================
看起来是不是有些像万花筒,在这个例子中加入了一些javascript的语句,代码如下:<html>
<head>
<title>blur css</title>
<script>
function handlechange(obj)
//*设置一个循环函数handlechange,对象是obj*//
{ with(obj.filters(0))//*Obj的filter属性*//
{ if (strength<255)//*设置循环条件*//
{ strength +=1;direction +=45;}
//*每循环一次strength就加1,direction加45度*//
}
}
</script>
</head>
<body>
<p><img id =“img1” src=http://old.zzzyk.com/article/Article/“ss01087.jpg”
style=“filter:blur(strength=1)”
onfilterchange=“handlechange(this)”>
//*导入一幅图片,初始blur属性strength等于1,同时调用onfilterchange函
数*//
</p>
</body>
</html>注:在javascript中blur属性是这样定义的:
[oBlurfilter=] object.Filters.blur这个例子是Blur属性的一个比较复杂的例子,下一节我将向您介绍两个较简单的blur属性效果。
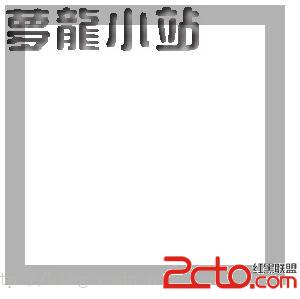
通过blur属性还可以设置页面中的字体。如果把字体的blur属性add参数值定义为1,得出来的字体效果是这样的(如下图):
怎么样,是不是有些印象派的意思,这种效果的实现代码如下:
<html>
<head>
<title>filter blur</title>
<style>//*CSS样式定义开始*//
<!--
div{width:200;
filter:blur(add=true,direction=90,strength=25);}
//*设置DIV样式,滤镜blur属性*//
-->
</style>
</head>
<body>
<div style=“width:702; height: 288”>
<p style=“font-family:lucida handwirting italic;
font-size:72;font-style:bold;color:rgb(55,72,145);” >
LEAF</p>
//*定义字体名称、大小、样式、前景色*//
</div>
</body>
</html>我们看到strength设置为25,如果把其值再改大一些,就会达到非常夸张的效果,同时把Direction参数值为180,显示效果如下图:
用blur属性设置字体可以达到很多效果,把direction和strength再做修改,还能达到多种效果,您可以自己修改试一试。
上一个:精通 CSS 滤镜(三)
下一个:CSS滤镜之Chroma属性
- 更多html/css疑问解答:
- div+css中关于ie浏览器中非啊元素的:hover的实现问题,哪位大神指点下啊
- css jquery代码中为什么宽度这样设定.menu li ul 150px;.menu li ul a 110px;.menu li a中padding的20px
- css 属性选择器 ie6 不支持吗?
- 用css、jquery做的选项卡效果,有一个小疑问,请高手指点,代码如下:
- 介绍本学习css的书
- wordpress多个CSS样式怎么调用?
- 这个div 的css是如何编写的
- div+css中,div的右边框小于div的高度且居中,除了用背景图片,如何实现?
- 表格立体感用CSS怎么写 我要 具体代码 写仔细 分段的 谢谢 了 兄弟 还有 下拉列表框 立体感用CSS 怎么写
- CSS 在一个大的DIV里面,另一个DIV怎么居中并置底。
- dw中html文档为什么无法链接css文档
- 设计一个小例子说明DIV+CSS的优势(例子要解释并注释)。
- 我会html css目前正在学js,打算在大三的寒假找个实习,请问应该找哪方面的实习?
- css问题,跪求大大帮忙
- 请教网页设计高手,如下图的这种css代码怎么写?
