Android 4.0 ICS SystemUI浅析——StatusBar工作流程之时间日期设置
本文主要分析StatusBar上的Clock以及Date加载以及工作流程,这算是比较简单的了,不过它们的实现还是值得一探究竟的,那么果断开始吧!
注:本文来自:http://blog.csdn.net/yihongyuelan 欢迎转载 请务必注明出处!
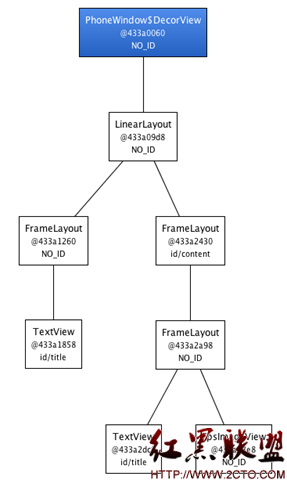
首先还是看看我们前面文章有提到的StatusBar组成结构图,如图1

图1
首先我们先找到SourceCode/framework/base/packages/SystemUI/src/com/android/systemui/statusbar/StatusBar.java中的start()方法,至于为什么要找到这里,我们在前面的文章已有叙述,代码如下:
[java]
public void start() {
// 因为我们前面已经分析过start方法,因此这里就不重复了,有兴趣的朋友请翻看前面的文章,这里主要引出Clock的初始化.
... ...
// 这里根据switches[0]的值,决定知否加载Clock
disable(switches[0]);
setSystemUiVisibility(switches[1]);
topAppWindowChanged(switches[2] != 0);
// StatusBarManagerService has a back up of IME token and it's restored here.
setImeWindowStatus(binders.get(0), switches[3], switches[4]);
setHardKeyboardStatus(switches[5] != 0, switches[6] != 0);
... ...
mDoNotDisturb = new DoNotDisturb(mContext);
}
public void start() {
// 因为我们前面已经分析过start方法,因此这里就不重复了,有兴趣的朋友请翻看前面的文章,这里主要引出Clock的初始化.
... ...
// 这里根据switches[0]的值,决定知否加载Clock
disable(switches[0]);
setSystemUiVisibility(switches[1]);
topAppWindowChanged(switches[2] != 0);
// StatusBarManagerService has a back up of IME token and it's restored here.
setImeWindowStatus(binders.get(0), switches[3], switches[4]);
setHardKeyboardStatus(switches[5] != 0, switches[6] != 0);
... ...
mDoNotDisturb = new DoNotDisturb(mContext);
} 根据这里的disable(),通过Open Implementation跳转到PhoneStatusBar中的disable方法,代码如下:
[java]
/**
* State is one or more of the DISABLE constants from StatusBarManager.
*/
public void disable(int state) {
final int old = mDisabled;
final int diff = state ^ old;
mDisabled = state;
... ...
if ((diff & StatusBarManager.DISABLE_CLOCK) != 0) {
boolean show = (state & StatusBarManager.DISABLE_CLOCK) == 0;
// 根据show的值(true/false)是否显示Clcok
showClock(show);
}
... ...
}
}
/**
* State is one or more of the DISABLE constants from StatusBarManager.
*/
public void disable(int state) {
final int old = mDisabled;
final int diff = state ^ old;
mDisabled = state;
... ...
if ((diff & StatusBarManager.DISABLE_CLOCK) != 0) {
boolean show = (state & StatusBarManager.DISABLE_CLOCK) == 0;
// 根据show的值(true/false)是否显示Clcok
showClock(show);
}
... ...
}
} 因为我们只关心Clock,因此其余部分代码在这里就省略了。继续跟踪showClock方法,代码如下:
[java]
public void showClock(boolean show) {
// 这里就完成了clock的初始化了 这里的mStatusBarView实际上就是图1中的id/icons。可以通过查看mStatusBarView初始化知道。
View clock = mStatusBarView.findViewById(R.id.clock);
if (clock != null) {
clock.setVisibility(show ? View.VISIBLE : View.GONE);
}
}
public void showClock(boolean show) {
// 这里就完成了clock的初始化了 这里的mStatusBarView实际上就是图1中的id/icons。可以通过查看mStatusBarView初始化知道。
View clock = mStatusBarView.findViewById(R.id.clock);
if (clock != null) {
clock.setVisibility(show ? View.VISIBLE : View.GONE);
}
} 初始化既然完成了,那么Clock是如何工作的呢?这就不得不找到Clock的实现了,那么该如何寻找呢?首先,找到clock的在id/icons中的布局文件,根据前文我们可以知道是msim_status_bar.xml,在其中可以看到:
[html]
<com.android.systemui.statusbar.policy.Clock
android:id="@+id/clock"
android:textAppearance="@style/TextAppearance.StatusBar.Clock"
android:layout_width="wrap_content"
android:layout_height="match_parent"
android:singleLine="true"
android:paddingRight="6dip"
android:gravity="center_vertical|left"
/>
<com.android.systemui.statusbar.policy.Clock
android:id="@+id/clock"
android:textAppearance="@style/TextAppearance.StatusBar.Clock"
android:layout_width="wrap_content"
android:layout_height="match_parent"
android:singleLine="true"
android:paddingRight="6dip"
补充:移动开发 , Android ,


