Iphone之选择图片滤镜功能的实现
Iphone之选择图片滤镜功能的实现
首先大家在做关于易做图软件的时候,会涉及到这样的功能,就是说给图片加滤镜,比如黑白,复古等效果,来使照片显示不同的效果。下面代码,就是如何实现了这一功能,当然,你可以加上你自己的效果,
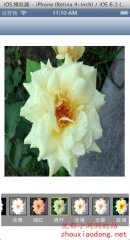
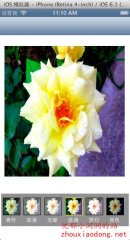
个实现的效果如图:


#import <UIKit/UIKit.h>
#import <QuartzCore/QuartzCore.h>

@inte易做图ce PhotoSelectViewController : UIViewController
{

IBOutlet UIImageView *imageView;//图片

IBOutlet UIScrollView *scrollerView;//滚动视图显示所有滤镜图片

UIImage *theImage;//原始图片

int selectIndex;//选择的第几个图片
}
@end
/******各种颜色的设定*******/
//LOMO
const float colormatrix_lomo[] = {
1.7f,  0.1f, 0.1f, 0, -73.1f,
0,  1.7f, 0.1f, 0, -73.1f,
0,  0.1f, 1.6f, 0, -73.1f,
0,  0, 0, 1.0f, 0 };

//黑白
const float colormatrix_heibai[] = {
0.8f,  1.6f, 0.2f, 0, -163.9f,
0.8f,  1.6f, 0.2f, 0, -163.9f,
0.8f,  1.6f, 0.2f, 0, -163.9f,
0,  0, 0, 1.0f, 0 };
//复古
const float colormatrix_huajiu[] = {
0.2f,0.5f, 0.1f, 0, 40.8f,
0.2f, 0.5f, 0.1f, 0, 40.8f,
0.2f,0.5f, 0.1f, 0, 40.8f,
0, 0, 0, 1, 0 };

//哥特
const float colormatrix_gete[] = {
1.9f,-0.3f, -0.2f, 0,-87.0f,
-0.2f, 1.7f, -0.1f, 0, -87.0f,
-0.1f,-0.6f, 2.0f, 0, -87.0f,
0, 0, 0, 1.0f, 0 };

//锐化
const float colormatrix_ruise[] = {
4.8f,-1.0f, -0.1f, 0,-388.4f,
-0.5f,4.4f, -0.1f, 0,-388.4f,
-0.5f,-1.0f, 5.2f, 0,-388.4f,
0, 0, 0, 1.0f, 0 };

//淡雅
const float colormatrix_danya[] = {
0.6f,0.3f, 0.1f, 0,73.3f,
0.2f,0.7f, 0.1f, 0,73.3f,
0.2f,0.3f, 0.4f, 0,73.3f,
0, 0, 0, 1.0f, 0 };

//酒红
const float colormatrix_jiuhong[] = {
1.2f,0.0f, 0.0f, 0.0f,0.0f,
0.0f,0.9f, 0.0f, 0.0f,0.0f,
0.0f,0.0f, 0.8f, 0.0f,0.0f,
0, 0, 0, 1.0f, 0 };

//清宁
const float colormatrix_qingning[] = {
0.9f, 0, 0, 0, 0,
0, 1.1f,0, 0, 0,
0, 0, 0.9f, 0, 0,
0, 0, 0, 1.0f, 0 };

//浪漫
const float colormatrix_langman[] = {
0.9f, 0, 0, 0, 63.0f,
0, 0.9f,0, 0, 63.0f,
0, 0, 0.9f, 0, 63.0f,
0, 0, 0, 1.0f, 0 };

//光晕
const float colormatrix_guangyun[] = {
0.9f, 0, 0,  0, 64.9f,
0, 0.9f,0,  0, 64.9f,
0, 0, 0.9f,  0, 64.9f,
0, 0, 0, 1.0f, 0 };

//蓝调
const float colormatrix_landiao[] = {
2.1f, -1.4f, 0.6f, 0.0f, -31.0f,
-0.3f, 2.0f, -0.3f, 0.0f, -31.0f,
-1.1f, -0.2f, 2.6f, 0.0f, -31.0f,
0.0f, 0.0f, 0.0f, 1.0f, 0.0f
};

//梦幻
const float colormatrix_menghuan[] = {
0.8f, 0.3f, 0.1f, 0.0f, 46.5f,
0.1f, 0.9f, 0.0f, 0.0f, 46.5f,
0.1f, 0.3f, 0.7f, 0.0f, 46.5f,
0.0f, 0.0f, 0.0f, 1.0f, 0.0f
};

//夜色
const float colormatrix_yese[] = {
1.0f, 0.0f, 0.0f, 0.0f, -66.6f,
0.0f, 1.1f, 0.0f, 0.0f, -66.6f,
0.0f, 0.0f, 1.0f, 0.0f, -66.6f,
0.0f, 0.0f, 0.0f, 1.0f, 0.0f
};

#import "PhotoSelectViewController.h"

@inte易做图ce PhotoSelectViewController ()

@end

@implementation PhotoSelectViewController

- (id)initWithNibName:(NSString *)nibNameOrNil bundle:(NSBundle *)nibBundleOrNil
{
self = [super initWithNibName:nibNameOrNil bundle:nibBundleOrNil];
if (self) {
// Custom initialization
}
return self;
}

- (void)viewDidLoad
{
[super viewDidLoad];

theImage = [UIImage imageNamed:@"photo.png"];
imageView.image = theImage;

//添加滤镜
NSArray *arr = [NSArray arrayWithObjects:@"原图",@"LOMO",@"黑白",@"复古",@"哥特",@"锐色",@"淡雅",@"酒红",@"青柠",@"浪漫",@"光晕",@"蓝调",@"梦幻",@"夜色", nil];
//设置滚动视频的属性
scrollerView.backgroundColor = [UIColor colorWithRed:0 green:0 blue:0 alpha:0.5];
scrollerView.indicatorStyle = UIScrollViewIndicatorStyleBlack;
scrollerView.showsHorizontalScrollIndicator = NO;
scrollerView.showsVerticalScrollIndicator = NO;//关闭纵向滚动条
scrollerView.bounces = NO;

//把所有的显示效果图添加到scrollerView里面
float x ;//计算x坐标
for(int i=0;i<arr.count;i++)
{
x = 5 + 51*i;
//添加点击手势识别,来处理选择的图片
UITapGestureRecognizer *recognizer = [[UITapGestureRecognizer alloc] initWithTarget:self action:@selector(setImageStyle:)];
recognizer.numberOfTouchesRequired = 1;
recognizer.numberOfTapsRequired = 1;

//添加名字标签
UILabel *label = [[UILabel alloc] initWithFrame:CGRectMake(x, 53, 40, 23)];
[label setBackgroundColor:[UIColor clearColor]];
[label setText:[arr objectAtIndex:i]];
[label setTextAlignment:NSTextAlignmentCenter];
[label setFont:[UIFont systemFontOfSize:13.0f]];
[label setTextColor:[UIColor whiteColor]];
[label setUserInteractionEnabled:YES];
[label setTag:i];

[scrollerView addSubview:label];

//添加效果图片
int tag = i+1000;
UIImageView *bgImageView = [[UIImageView alloc]initWithFrame:CGRectMake(x, 10, 43, 43)];
[bgImageView setTag:tag];
[bgImageView addGestureRecognizer:recognizer];
[bgImageView setUserInteractionEnabled:YES];
UIImage *bgImage = [self changeImage:bgImageView.tag imageView:nil];
bgImageView.image = bgImage;
[scrollerView addSubview:bgImageView];
[bgImageView setBackgroundColor:[UIColor redColor]];

//导入 <QuartzCore/QuartzCore.h>
//添加是否选中边框,选中时边框为黄色,默认是第一个被选中的
if (i == 0) {

CALayer * layer = [bgImageView layer];
layer.borderColor = [[UIColor yellowColor] CGColor];
layer.borderWidth = 1.0f;

selectIndex = tag;
}else{
CALayer * layer = [bgImageView layer];
layer.borderColor = [[UIColor blackColor] CGColor];
layer.borderWidth = 1.0f;
}

}
//设置滚动视图的实际大小
scrollerView.contentSize = CGSizeMake(x + 55, 60);

}
//选择图片处理方法
- (IBAction)setImageStyle:(UITapGestureRecognizer *)sender
{
//获取效果图
UIImage *image =   [self changeImage:sender.view.tag imageView:nil];

if (selectIndex != sender.view.tag) {
//取消选择边框
UIImageView *noselectImageView = (UIImageView*)[self.view viewWithTag:selectIndex];
CALayer * nolayer = [noselectImageView layer];
nolayer.borderColor = [[UIColor blackColor] CGColor];
nolayer.borderWidth = 1.0f;

selectIndex = sender.view.tag;
UIImageView *selectImageView = (UIImageView*)[self.view viewWithTag:selectIndex];
//添加选择边框
CALayer * layer = [selectImageView layer];
layer.borderColor = [[UIColor yellowColor] CGColor];
layer.borderWidth = 1.0f;
}

//图片设置
[imageView setImage:image];
}

//选择的效果图
-(UIImage *)changeImage:(int)index imageView:(UIImageView *)imageView
{
UIImage *image;

switch (index-1000) {
case 0:
{
return theImage;
}
break;
case 1:
{
image = [self imageWithImage:theImage withColorMatrix:colormatrix_lomo];
}
break;
case 2:
{
image = [self imageWithImage:theImage withColorMatrix:colormatrix_heibai];
}
break;
case 3:
{
image = [self imageWithImage:theImage withColorMatrix:colormatrix_huajiu];
}
break;
case 4:
{
image = [self imageWithImage:theImage withColorMatrix:colormatrix_gete];
}
break;
case 5:
{
image = [self imageWithImage:theImage withColorMatrix:colormatrix_ruise];
}
break;
case 6:
{
image = [self imageWithImage:theImage withColorMatrix:colormatrix_danya];
}
break;
case 7:
{
image = [self imageWithImage:theImage withColorMatrix:colormatrix_jiuhong];
}
break;
case 8:
{
image = [self imageWithImage:theImage withColorMatrix:colormatrix_qingning];
}
break;
case 9:
{
image = [self imageWithImage:theImage withColorMatrix:colormatrix_langman];
}
break;
case 10:
{
image = [self imageWithImage:theImage withColorMatrix:colormatrix_guangyun];
}
break;
case 11:
{
image = [self imageWithImage:theImage withColorMatrix:colormatrix_landiao];

}
break;
case 12:
{
image = [self imageWithImage:theImage withColorMatrix:colormatrix_menghuan];

}
break;
case 13:
{
image = [self imageWithImage:theImage withColorMatrix:colormatrix_yese];

}
}
return image;
}

//效果图
-(UIImage*)imageWithImage:(UIImage*)inImage withColorMatrix:(const float*) f
{
unsigned char *imgPixel = RequestImagePixelData(inImage);
CGImageRef inImageRef = [inImage CGImage];
GLuint w = CGImageGet补充:移动开发 , IOS ,


