当前位置:编程学习 > C#/ASP.NET >>
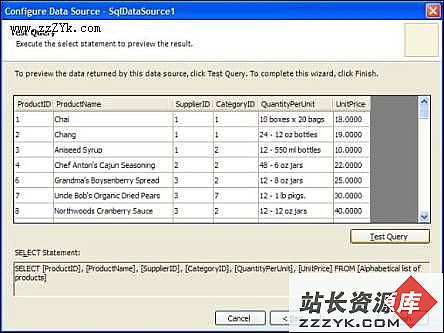
答案:     此时,你可以选择要显示的列,如下图:


  点"next"到下一步,此时可以看到系统为你自动生成的sql语句,最后点"FINISH"结束操作。


  这样,已经建立好数据连接了,我们可以切换到代码视图,查看刚才系统创建的代码如下,其中请注意对connectionstring的引用格式。

  <ASP:SqlDataSource ID="SqlDataSource1"
  Runat="server"
  SelectCommand="SELECT [ProductID], [ProductName], [SupplierID],
  [CategoryID], [QuantityPerUnit], [UnitPrice] FROM
  [Alphabetical list of products]"
  ConnectionString="<%$ ConnectionStrings: NorthWindConn %>">
  </asp:SqlDataSource>

    第二步要做的是,将gridview控件和sqldatasource控件绑定。先拖拉一个gridview控件到设计窗口中,并且在选择sqldatasource1做为它的数据源,并且将Enable paging,Enable sorting,Enable selection等三个选择框都选择,之后我们就可以马上看到其效果了,如下图


  最后,运行程序,可以看到运行的效果了。

    接下来,我们学习如何编辑和删除数据。这时我们要用到UpdateCommand 和 DeleteCommand两个属性,分别指明更新数据和删除数据要用到的sql语句,要修改sqldatasource的代码如下:

  <asp:SqlDataSource ID="SqlDataSource1" Runat="server"
  SelectCommand="SELECT [ProductID], [ProductName], [SupplierID], [CategoryID],
  [QuantityPerUnit], [UnitPrice] FROM [Alphabetical list of products]"
  ConnectionString="<%$ ConnectionStrings:NorthWindConn %>"
  UpdateCommand="UPDATE Products SET ProductName = @ProductName,
  SupplierID= @SupplierID, CategoryID =@CategoryID , QuantityPerUnit = @QuantityPerUnit ,
  UnitPrice = CONVERT(money,@UnitPrice) WHERE ProductID=@ProductID"
  DeleteCommand="DELETE FROM Products WHERE ProductID=@ProductID">
  </asp:SqlDataSource>

    运行程序,效果如下图:


  最后,我们再来看一个叫detailviews的数据控件,它与gridview控件的用法类似,但不 同的是,每次只显示一条记录。将工具栏中的detailviews控件拖拉到设计窗体中,并设置其数据源为sqldatasource1,并选择其分页的选择框,如下图:


  而如何往gridview中插入一条新记录呢?在beta 1版本中,gridview暂时不提供自动增加的功能,但可以通过其他方法实现,比如,在sqldatasource的代码中使用insertcommand属性,代码如下:

  <asp:SqlDataSource ID="SqlDataSource1" Runat="server"
  SelectCommand="SELECT [ProductID], [ProductName], [SupplierID], [CategoryID],
  [QuantityPerUnit], [UnitPrice] FROM [Products]"
  ConnectionString="<%$ ConnectionStrings:NorthWindConn %>"
  UpdateCommand="UPDATE Products SET ProductName = @ProductName,
  SupplierID= @SupplierID, CategoryID = @CategoryID ,
  QuantityPerUnit = @QuantityPerUnit , UnitPrice = CONVERT(money,@UnitPrice)
  WHERE (ProductID=@ProductID)"
  DeleteCommand="DELETE FROM Products WHERE ProductID=@ProductID"
  InsertCommand="INSERT INTO Products (ProductName, SupplierID, CategoryID,
  QuantityPerUnit, UnitPrice) VALUES (@ProductName, @SupplierID, @CategoryID,
  @QuantityPerUnit,CONVERT(money,@UnitPrice))">
  </asp:SqlDataSource>

    当完成上面的代码后,detailviews控件的自动智能感知提示,会显示enable inserting的选择框,只需要勾选该选择框就可以新增记录了,效果如下图:


   本文简单对ASP.NET 2.0中的gridview控件及其基本用法做了介绍,相信在正式版的VS.net 2005中,gridview控件将有更大的改进。


