自定义android的tab样式
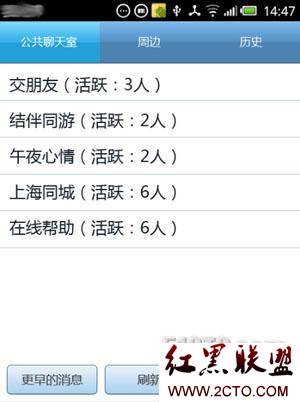
android项目中碰到需要替换tabHost默认样式的情况,需要达到下图的效果:

为了做成这样的效果,花了些时间,这里做个笔记,给有需要的朋友。
步骤一:新建一个xml布局文件,命名main.xml
<?xml version="1.0" encoding="utf-8"?>
<TabHost xmlns:android="http://schemas.android.com/apk/res/android"
android:id="@android:id/tabhost" android:layout_width="fill_parent"
android:layout_height="fill_parent" android:background="@color/white">
<LinearLayout android:orientation="vertical"
android:layout_width="fill_parent" android:layout_height="fill_parent">
<TabWidget android:id="@android:id/tabs"
android:layout_width="fill_parent" android:layout_height="wrap_content"
android:gravity="center_horizontal|center_vertical"/>
<FrameLayout android:id="@android:id/tabcontent"
android:layout_width="fill_parent" android:layout_height="fill_parent">
</FrameLayout>
</LinearLayout>
</TabHost>
步骤二:在Activity中添加我们的tab
代码如下
@Override
public void onCreate(Bundle savedInstanceState) {
super.onCreate(savedInstanceState);
setContentView(R.layout.main);
mTabHost = getTabHost();
Intent intent1 = new Intent(this,OfficialActivity.class);
createTab("公共聊天室",intent1);
Intent intent2 = new Intent(this, NearByActivity.class);
createTab("周边",intent2);
Intent intent3= new Intent(this, HistoryActivity.class);
createTab("历史",intent3);
mTabHost.setCurrentTab(1);
}
private void createTab(String text ,Intent intent){ mTabHost.addTab(mTabHost.newTabSpec(text).setIndicator(createTabView(text)).setContent(intent));
}
private View createTabView(String text) {
View view = LayoutInflater.from(this).inflate(R.layout.tab_indicator, null);
TextView tv = (TextView) view.findViewById(R.id.tv_tab);
tv.setText(text);
return view;
}
步骤三:在createTabView方法中,我们载入了布局文件tab_indicator.xml,改布局很简单,就是放置一个带背景的布局,在布局中放一个textView用于显示tab标题,以下为该布局文件内容
<?xml version="1.0" encoding="utf-8"?>
<LinearLayout xmlns:android="http://schemas.android.com/apk/res/android"
android:layout_height="fill_parent" android:layout_width="fill_parent"
android:orientation="vertical" android:gravity="center"
android:theme="@android:style/Theme.NoTitleBar" android:background="@drawable/chat_tab_selector">
<TextView android:id="@+id/tv_tab" android:layout_width="wrap_content" android:layout_height="wrap_content"
android:text="tab1" android:textColor="@color/white"/>
</LinearLayout>
步骤四:在上面的布局文件中我们把该布局的背景定义为chat_tab_selector,这里同样需要在drawable文件夹下新建chat_tab_selector.xml,内容很简单,就是做一个按下时的背景切换,内容如下:
<?xml version="1.0" encoding="utf-8"?>
<selector xmlns:android = "http://schemas.android.com/apk/res/android">
<item
android:state_focused = "true"
android:drawable = "@drawable/topbar_bg_down"
/>
<item
android:state_selected = "true"
android:drawable = "@drawable/topbar_bg_down"
/>
<item
android:state_pressed = "true"
android:drawable = "@drawable/topbar_bg_down"
/>
<item android:drawable = "@drawable/topbar_background" />
</selector>
里面做了两张图进行状态切换,这两张图同样放drawable下就可以了
至此,自定义tab的步骤就完成了。如果要做成更复杂的样式,大家可以在此基础上进行扩展。
本文出自 “我的JAVA之路” 博客
补充:移动开发 , Android ,


