Android ApiDemos示例解析(146):Views->Layouts->LinearLayout->6. Uniform Size
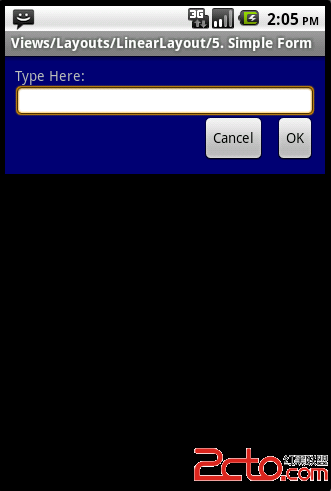
本例利用LinearLayout 构造一个输入表单,并使用layout_gravity 对齐来布置按钮显示的位置。
LinearLayout xmlns:android=”http://schemas.android.com/apk/res/android”
android:orientation=”vertical”
android:background=”@drawable/blue”
android:layout_width=”match_parent”
android:layout_height=”wrap_content”
android:padding=”10dip”>
<!–
TextView goes on top…
–>
<TextView
android:layout_width=”match_parent”
android:layout_height=”wrap_content”
android:text=”@string/linear_layout_5_instructions”/>
<!–
Followed by the EditText field…
Also give it a standard background (the “android:”
part in @android:drawable/editbox_background
means it is system resource rather than
an application resource.
–>
<EditText
android:layout_width=”match_parent”
android:layout_height=”wrap_content”
android:background=”@android:drawable/editbox_background”/>
<!–
Use a horizontal layout to hold the two buttons.
This item has layout_gravity=”right”. This means the whole
horizontal LinearLayout is right aligned, not the individual
items within it. The horizontal LinearLayout’s width is set to
wrap_content. (If it was match_parent it would not have any
room to slide to the right.)
–>
<LinearLayout
android:orientation=”horizontal”
android:layout_width=”wrap_content”
android:layout_height=”wrap_content”
android:layout_gravity=”right” >
<Button
android:layout_width=”wrap_content”
android:layout_height=”wrap_content”
android:text=”@string/linear_layout_5_cancel”/>
<Button
android:layout_width=”wrap_content”
android:layout_height=”wrap_content”
android:layout_marginLeft=”10dip”
android:text=”@string/linear_layout_5_ok” />
</LinearLayout>
</LinearLayout>
补充:移动开发 , Android ,