Android自定义控件实现及其布局
Android自定义控件实现及其布局
Android自定义控件一般要继承View类,因此控件的实现及其相应的布局需要完成:
1. 继承View类,并实现参数为(Context context,AttributeSet attrs)的构造函数
2. 在布局文件xml中设置属性的时候,应以(<包名.类名 />)的格式进行。
3. 声明一个自定义控件的变量,用findViewById将其与布局文件关联起来。
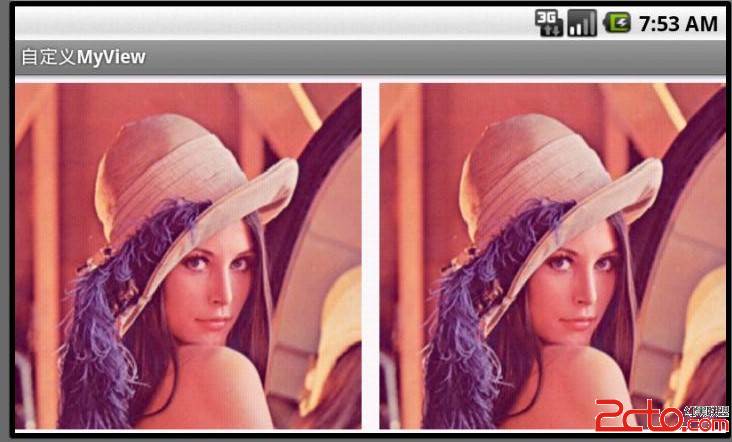
举例:以下是自定义的MyView控件,用于显示2张图片;
MyView.java代码
[java]
package com.example.njupt.zhb.myselfview;
import android.content.Context;
import android.graphics.Bitmap;
import android.graphics.Canvas;
import android.graphics.RectF;
import android.util.AttributeSet;
import android.view.View;
public class MyView extends View {
public Bitmap bitmap1=null;
public Bitmap bitmap2=null;
public int myInterval=10;
/*一定要重写这个构造方法*/
public MyView(Context context,AttributeSet attrs) {
super(context,attrs);
}
/*重写onDraw()*/
@Override
protected void onDraw(Canvas canvas)
{
super.onDraw(canvas);
int myViewWidth=getWidth()-myInterval*2;
int myViewHeight=getHeight()-myInterval;
int lessLen=myViewWidth/2<myViewHeight?myViewWidth/2:myViewHeight;
/*画位图1*/
if (bitmap1!=null) {
RectF dst1=new RectF(0,myInterval,lessLen,lessLen+myInterval);
canvas.drawBitmap(bitmap1, null, dst1, null);
}
/*画位图2*/
if(bitmap2!=null){
RectF dst2=new RectF(lessLen+myInterval*2,myInterval,lessLen*2+myInterval*2,lessLen+myInterval);
canvas.drawBitmap(bitmap2, null, dst2, null);
}
}
}
MainActivity.java代码
[java]
package com.example.njupt.zhb.myselfview;
import android.os.Bundle;
import android.app.Activity;
import android.graphics.Bitmap;
import android.graphics.BitmapFactory;
import android.view.Menu;
public class MainActivity extends Activity {
MyView myView;
@Override
public void onCreate(Bundle savedInstanceState) {
super.onCreate(savedInstanceState);
setContentView(R.layout.activity_main);
setTitle("自定义MyView");
Bitmap bitmap=BitmapFactory.decodeResource(getResources(), R.drawable.lenna);
myView=(MyView)findViewById(R.id.myview);
myView.bitmap1=bitmap;
myView.bitmap2=bitmap;
}
}
activity_main.xml代码
<RelativeLayout xmlns:android="http://schemas.android.com/apk/res/android"
xmlns:tools="http://schemas.android.com/tools"
android:layout_width="fill_parent"
android:layout_height="fill_parent" >
<com.example.njupt.zhb.myselfview.MyView
android:id="@+id/myview"
android:layout_width="wrap_content"
android:layout_height="wrap_content"/>
</RelativeLayout>
AndroidManifest.xml代码
[html]
<manifest xmlns:android="http://schemas.android.com/apk/res/android"
package="com.example.njupt.zhb.myselfview"
android:versionCode="1"
android:versionName="1.0" >
<uses-sdk
android:minSdkVersion="4"
android:targetSdkVersion="15" />
<application
android:icon="@drawable/ic_launcher"
android:label="@string/app_name"
android:theme="@style/AppTheme" >
<activity
android:name=".MainActivity"
android:screenOrientation="landscape"
android:label="@string/title_activity_main" >
<intent-filter>
<action android:name="android.intent.action.MAIN" />
<category android:name="android.intent.category.LAUNCHER" />
</intent-filter>
</activity>
</application>
</manifest>
补充:移动开发 , Android ,