Android ApiDemos示例解析(50):Content->Resources->External Storage
应用程序也可以使用外部存储空间,比如SD卡来存取资源。本例介绍了如何使用外部存储空间来创建,删除文件。
本例使用SD卡的三个位置来创建文件,两个是应用程序私有的,随着应用程序的删除被删除,另外一个是共用的SD卡上Picuture目录。两个私有目录说是私有,但由于是在SD卡,别的应用程序也是可以访问的,只是它创建的目录名和应用程序相关,一般来说可以保证目录名的唯一性。
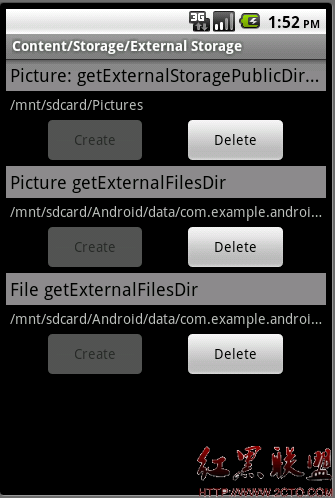
类Environment 可以用来查询一些环境变量,比如是否含有外部存储器(SD卡),外部存储器的目录名等。下面代码取得外部存储器上Picture目录名:
[java]
//createExternalStoragePublicPicture
File path = Environment.getExternalStoragePublicDirectory(
Environment.DIRECTORY_PICTURES);
File file = new File(path, "DemoPicture.jpg");
//createExternalStoragePublicPicture
File path = Environment.getExternalStoragePublicDirectory(
Environment.DIRECTORY_PICTURES);
File file = new File(path, "DemoPicture.jpg");
而Context类的getExternalFilesDir 可以取得应用程序在外部存储器的私有目录,getExternalFilesDir可以带参数,也可以使用Null。
[java]
//createExternalStoragePrivatePicture
File path = getExternalFilesDir(Environment.DIRECTORY_PICTURES);
File file = new File(path, "DemoPicture.jpg");
...
//createExternalStoragePrivateFile
File file = new File(getExternalFilesDir(null), "DemoFile.jpg");
//createExternalStoragePrivatePicture
File path = getExternalFilesDir(Environment.DIRECTORY_PICTURES);
File file = new File(path, "DemoPicture.jpg");
...
//createExternalStoragePrivateFile
File file = new File(getExternalFilesDir(null), "DemoFile.jpg");
三种方法创建的对应着SD卡的位置如下图所示:
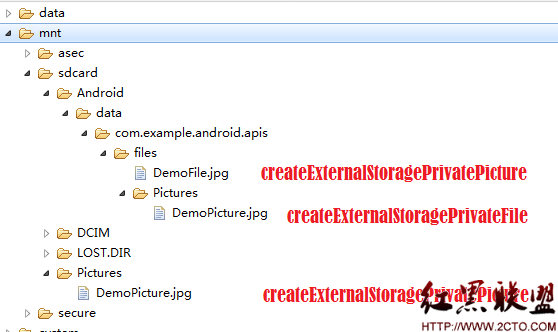
此外本例还同时说明了一种自定义View以及动态在ViewGroup在添加View的方法,本例使用的两个Layout资源:
R.layout.external_storage为整体布局,根View为一Id为R.id.layout 的LinearLayout。
R.layout.external_storage_item 为一自定义控件,有多个View组成:
<LinearLayout xmlns:android=”http://schemas.android.com/apk/res/android”
android:orientation=”vertical”
android:layout_width=”match_parent” android:layout_height=”wrap_content”>
<TextView android:id=”@+id/label” style=”?android:attr/textAppearanceMediumInverse”
android:layout_width=”match_parent” android:layout_height=”wrap_content”
android:layout_weight=”0″
android:padding=”4dip”
android:singleLine=”true”
android:color=”?android:attr/textColorPrimaryInverse”
android:background=”#888″ />
< TextView android:id=”@+id/path” style=”?android:attr/textAppearanceSmall”
android:layout_width=”match_parent” android:layout_height=”wrap_content”
android:layout_weight=”0″
android:padding=”4dip”
android:singleLine=”true” />
<LinearLayout
android:orientation=”horizontal”
android:layout_width=”match_parent” android:layout_height=”wrap_content”>
<View
android:layout_width=”0dip”
android:layout_height=”0dip”
android:layout_weight=”1″ />
< Button android:id=”@+id/create”
android:layout_width=”wrap_content”
android:layout_height=”wrap_content”
android:layout_weight=”1″
android:text=”@string/create” />
<View
android:layout_width=”0dip”
android:layout_height=”0dip”
android:layout_weight=”1″ />
< Button android:id=”@+id/delete”
android:layout_width=”wrap_content”
android:layout_height=”wrap_content”
android:layout_weight=”1″
android:text=”@string/delete” />
<View
android:layout_width=”0dip”
android:layout_height=”0dip”
android:layout_weight=”1″ />
< /LinearLayout>
< /LinearLayout>
上面三个粗体定义的无ID的View为两个按钮Create, Delete之间的占位符。
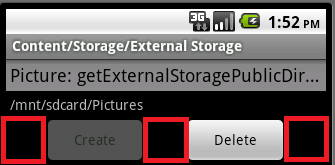
方法createStorageControls 使用R.layout.external_storage_item 为模板重新定义文本框显示以及Create,Delete的回调函数。
然后动态将三个自定义组件添加到Layout中,这就构成了最后的UI。
[java]
mLayout.addView(mExternalStoragePublicPicture.mRoot);
mLayout.addView(mExternalStoragePrivatePicture.mRoot);
mLayout.addView(mExternalStoragePrivateFile.mRoot);
mLayout.addView(mExternalStoragePublicPicture.mRoot);
mLayout.addView(mExternalStoragePrivatePicture.mRoot);
mLayout.addView(mExternalStoragePrivateFile.mRoot);
作者:mapdigit
补充:移动开发 , Android ,

